Hướng dẫn cài đặt SharePoint Server 2016
Vấn đề:
Chúng ta có thể cài đặt và cấu hình SharePoint Server 2016 trên một Server. Nếu chúng ta đang lưu trữ một vài site cho số lượng user nhất định hoặc nếu chúng ta muốn test trước khi cài đặt hoặc dùng trial. Cấu hình này cũng hữu ích nếu chúng ta muốn cấu hình farm để đáp ứng trước nhu cầu của chúng ta. Sau đó có thể thêm một vài server vào farm ở giai đoạn sau.
Giải quyết:
Hướng dẫn cài đặt SharePoint Server 2016 trên một Server:
Bước 1: Run the Microsoft SharePoint 2016 Products Preparation Tool
1.Bảo đảm rằng tài khoản user đang thực hiện quá trình cài đặt là tài khoản Setup user.
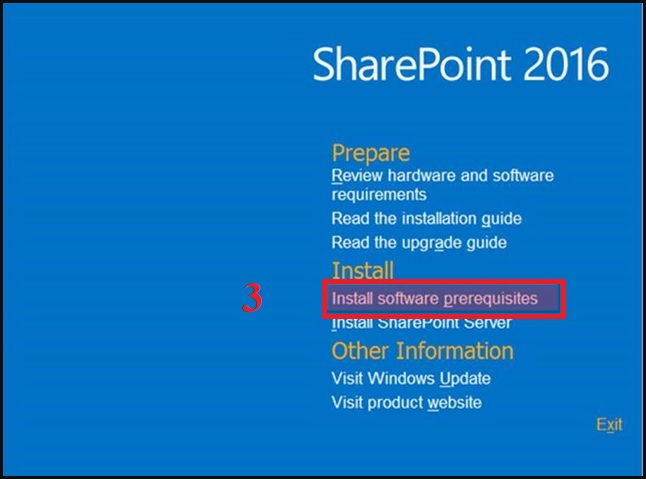
2.Trong đĩa cài đặt SharePoint Server 2016, chúng ta mount file ISO và click vào tệp splash.hta. Giao diện cài đặt SharePoint Server 2016 được hiển thị.
3.Click Install software prerequisites.
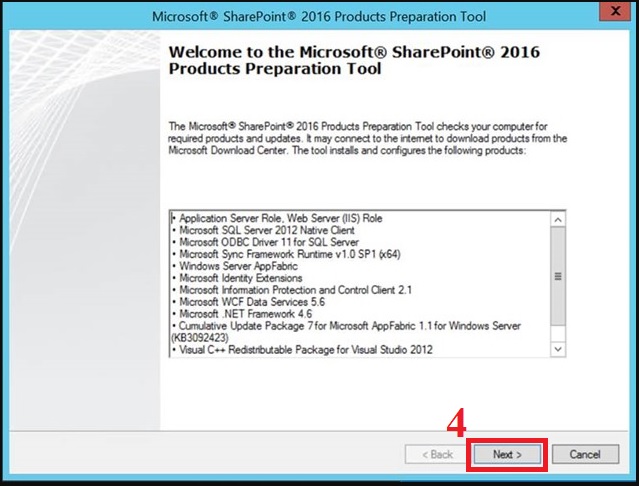
4.Click Next tại page Welcome to the SharePoint 2016 Products Preparation Tool
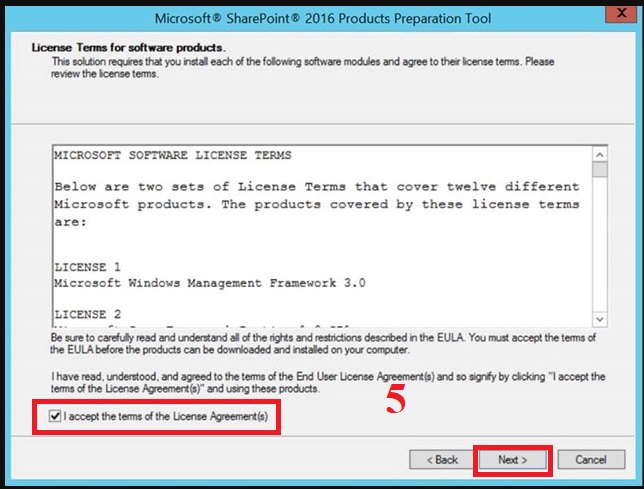
5.Chọn I accept the terms of the License Agreement(s), sau đó click Next.
6.Click Finish trên page Your system needs to restart to continue.
7.Lặp lại bước 2,3,4 nếu xảy ra bước 6.
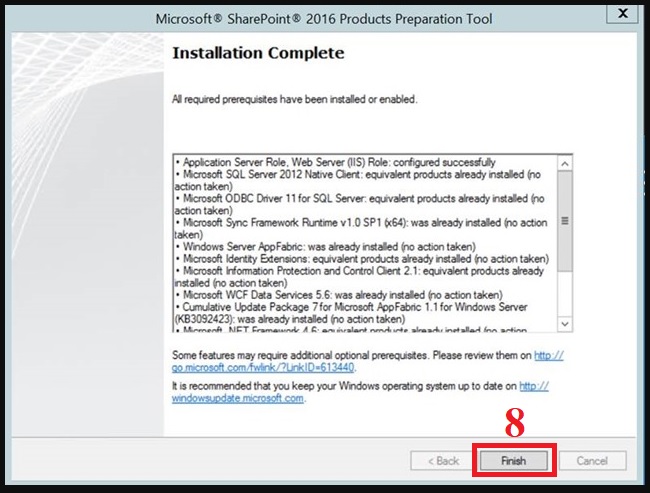
8.Click Finsih tại page Installation Complete.
Bước 2:Run Setup
1.Trong đĩa cài đặt SharePoint Server 2016, chúng ta mount file ISO và click vào tệp splash.hta. Giao diện cài đặt SharePoint Server 2016 được hiển thị.
2.Click Install Sharepoint Server.
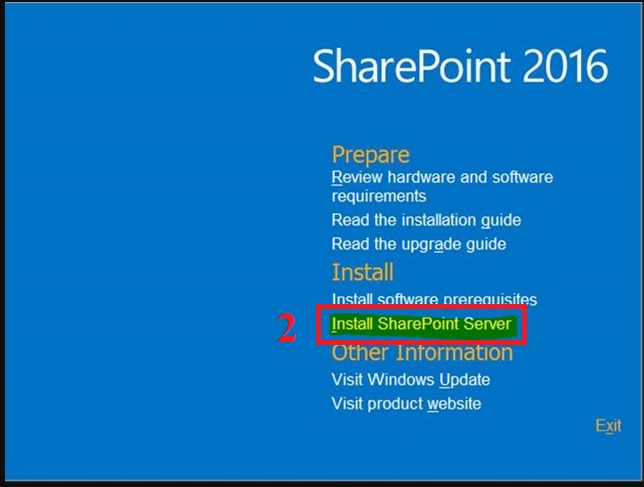
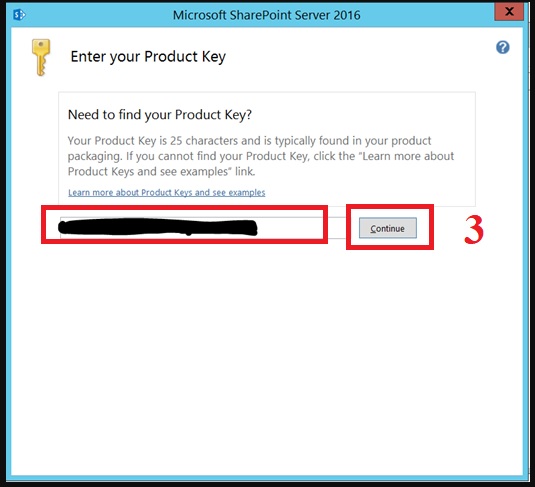
3.Nhập Key vào mục Enter Your Product Key, sau đó click Continue.
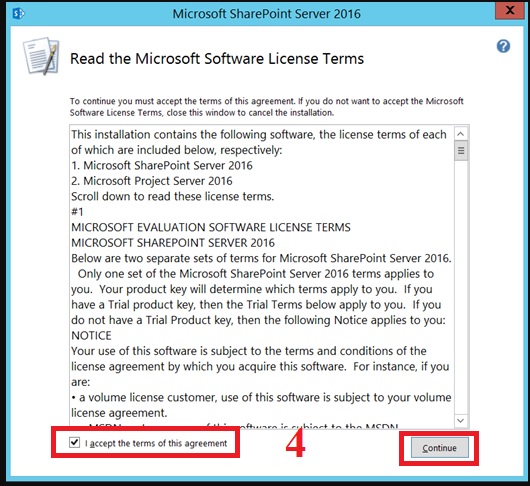
4.Chọn I accept the terms of this agreement, sau đó click Continue.
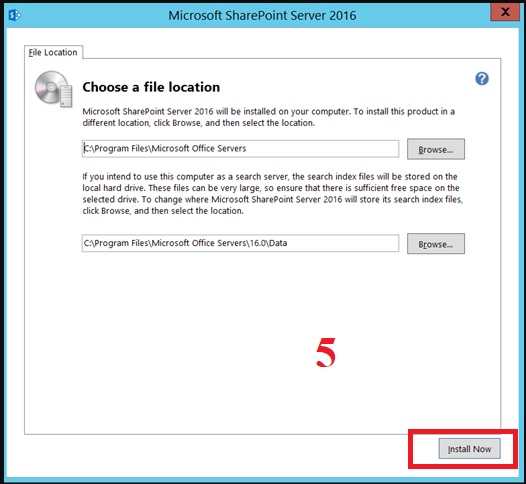
5.Chỉnh sửa vị trí setup file, sau đó click Install. Quá trình cài đặt diễn ra vài phút
6.Tại tab Run Configuration Wizard, chọn Run the SharePoint Products Configuration Wizard now
7.Click Close.
Bước 3: Run the SharePoint Products Configuration Wizard
1.Nếu chúng ta đã đóng SharePoint Products Configuration Wizard, chúng ta có thể mở lại bằng cách click Start, chuyển đến All Apps, click Microsoft SharePoint 2016 Products, click SharePoint 2016 Products Configuration Wizard. Nếu hộp thoại User Account Control xuất hiện, click Continue.(có thể bỏ qua bước này nếu chúng ta chưa đóng SharePoint Products Configuration Wizard)
2.Tại Welcome to SharePoint Products page, click Next.
3.Hộp thoại thông báo hiện lên , click Yes.
4.Tại Connect to a server farm page, click Create a new server farm, sau đó click Next.
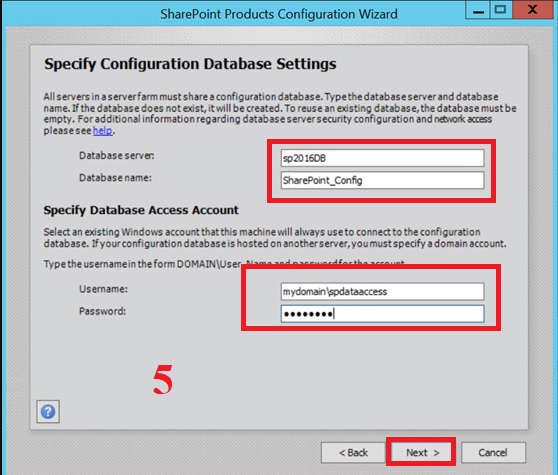
5.Tại Specify Configuration Database Settings page, chúng ta nhập thông tin vào trường Database server, Database name, Username, Password. Sau đó click Next.
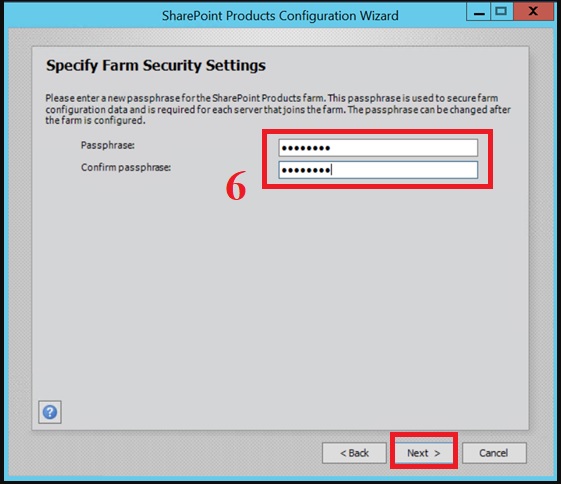
6.Nhập passphrase tại Specify Farm Security Settings page. Sau đó click Next.
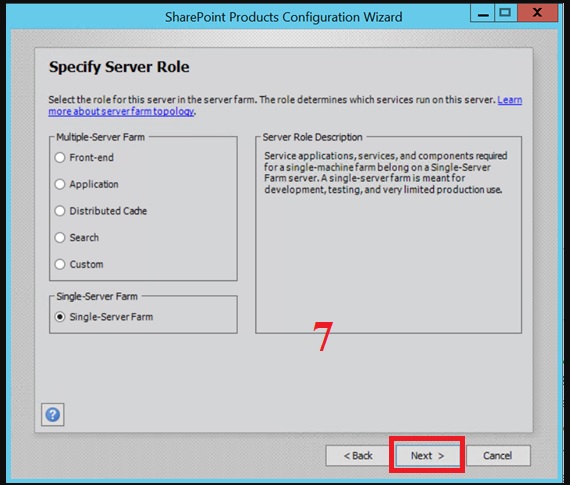
7.Chọn Role thích hợp tại Specify Server Role, sau đó click Next.
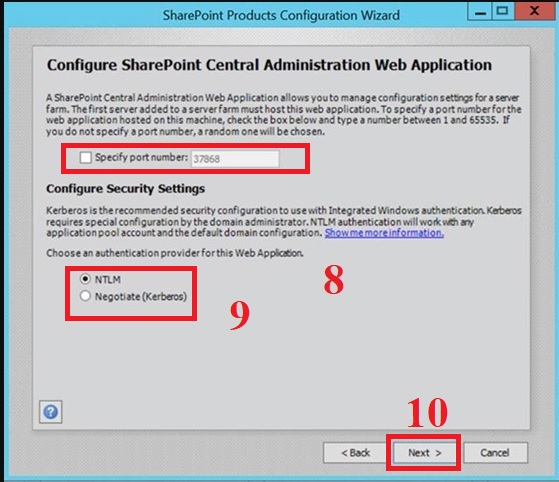
8.Tick vào Specify port number và nhập port nếu chúng ta muốn thay đổi port mặc định tại Configure SharePoint Central Administration Web Application
9.Chọn NTLM hoặc Negotiate (Kerberos) tại Configure Security Settings.
10.Click Next
11.Xem lại thông tin chúng ta đã cấu hình tại Completing the SharePoint Products Configuration Wizard, sau đó click Next.
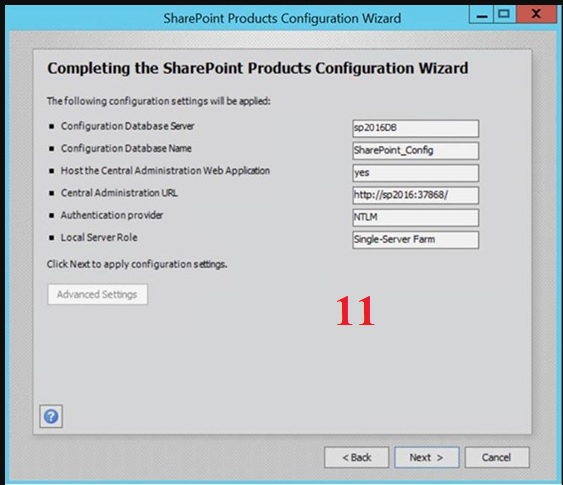
12.Click Finish.
Bước 4:Cài đặt Browser
Add SharePoint Central Administration website vào danh sách web tin cậy:
1.Trong Internet Explorer, tại Tools menu, click Internet Options.
2.Tại Security tab, trong Select a zone to view or change security settings, click Trusted Sites và click Sites.
3.Bỏ tick Require server verification (https:) for all sites in this zone.
4.Tại mục Add this web site to the zone, gõ URL đến site của chúng ta, sau đó click Add.
5.Click Close.
6.Click OK.
Vô hiệu hóa Internet Explorer Enhanced Security:
1.Click Start >All Apps >Administrative Tools, click Server Manager.
2.Tại Server Manager, chọn Server Manager.
3.Tại Security Information, click Configure IE ESC. Hộp thoại Internet Explorer Enhanced Security Configuration hiện ra.
5.Tại Administrators , click Off để vô hiệu hóa Internet Explorer Enhanced Security, sau đó click OK.
Cấu hình proxy sever để bỏ qua proxy server cho địa chỉ local:
1.Truy cập Internet Explorer >Tools menu, click Internet Options.
2.Tại Connections tab, trong Local Area Network (LAN) settings, click LAN Settings.
3.Tại Automatic configuration, bỏ tick Automatically detect settings.
4.Tại Proxy Server, click Use a proxy server for your LAN
5.Nhập địa chỉ proxy server vào Address.
6.Nhập port của proxy server vào Port.
7.Chọn Bypass proxy server for local addresses.
8.Click OK >OK.
Bước 5: Run the Farm Configuration Wizard
1.Tại SharePoint Central Administration, trên Quick Launch, click Configuration Wizards > Launch the Farm Configuration Wizard.
2.Tại Help Make SharePoint Better, click Yes, I am willing to participate (Recommended.) hoặc No, I don’t want to participate, sau đó click OK
3.Click Start the Wizard.
4.Chọn service account mà chúng ta muốn sử dụng để cấu hình cho thiết bị tại Service Account
5.Click Next.
6.Tại Create Site Collection nhập một số thông tin:
a.Tại trường Title and Description, nhập tên cho site mới tại Title.
b.Nhập mô tả cho site tại Description.
c.Nhập URL cho site tại Web Site Address
d.Tại Template Selection, click Select a template > chọn template.
7.Click OK.
8.Xem lại thông tin và click Finish.
Quốc Toàn – Pacisoft Vietnam
Nguồn: PACISOFT.vn | PACISOFT.vn


